|
25. Reflection
copy recording
So everything is ready for recording a copy
of the hologram. We lower the copying arrangement
from metallic supports on the inflated balls,
turn off the light and finally check position
of the recording beams. Then we remove the screen
out of the frame for the photoplate, turn on
the green lamp and block the laser beam. We
take a photoplate out of the box, look through
opening at the green lamp and check if there
are particles of dust or pieces of glass on
the plate surface. If there are some we brush
them off with the help of a soft brush without
damaging the emulsion layer. Then we carefully
place the photoplate into the frame with the
emulsion side turned to the reference beam.
A big time of recording the hologram (30-120
seconds) and large sizes of photographic plates
imposes certain requirements relating to fastening
of photoplates and to subsequent endurance of
the whole scheme (stabilization). It’s possible
to say that during the whole period of existence
of the pictorial holography using CW lasers
there continued a permanent struggle against
displacements and vibrations of the object and
photoplate. But why only displacements and vibrations
of the object and photoplate? – You may ask.
Because other elements of the holographic copying
scheme (and also elements of the Denisyuk scheme):
the mirrors, lenses, spatial filters and so
on are sufficiently rigid metallic structures
which are far less subjects to influence of external
disturbances. And what is a photoplate? Figuratively
speaking it is a membrane, which catches the
smallest external mechanical vibrations and
air flows. And if the frequency of these vibrations
coincides with its proper frequency a resonance
will occur by which the amplitude of vibrations
of the photoplate will increase considerably.
But of course if sizes of the photographic plate
are small, for example 6x6 cm, requirements
to its vibroprotection reduce considerably.
But if we record a hologram on the photographic
plate with the sizes 28x40 cm it’s necessary
to take all precautionary measures in order
not to throw out the expensive photoplate and
not to loose several hours of working time.
There exist five principal moments, which facilitate
solving the problem of stabilization of the
photographic plate position during exposure.
1. Protection of the holographic scheme from
vibrations of the building foundation through
mounting the table on the antivibration stands
(for example on the inflated footballs or car
tyres) and also from air flows in the room with
the help of the protective cover (depending
on situation these cover can be of foam plastic,
plywood or simply of thick fabric).
2. Fastening the master-hologram and the photographic
plate in the vertical position. In this case
influence of vibrations coming from the building
foundation will be minimum.
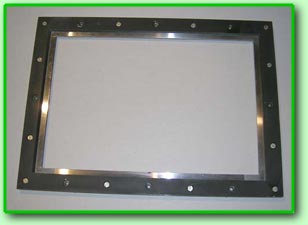 3.
Pressing the photographic plate to the rigid
steel frame, see the photo. If the plate is pressed
to the steel frame probability of its vibrations
decreases sharply. But if the frame has a skew
or uneven surface this can bring to nothing
all your efforts. Internal stresses will appear
in the photoplate, which won’t allow for the
plate to reach a “calm down” during a long time.
Therefore the frame surface to which the photoplate
is pressed should be ideally plane and thoroughly
polished. Then after pressing the internal stresses
won’t appear in the photoplate and the prolonged
stabilization of the scheme won’t become necessary. 3.
Pressing the photographic plate to the rigid
steel frame, see the photo. If the plate is pressed
to the steel frame probability of its vibrations
decreases sharply. But if the frame has a skew
or uneven surface this can bring to nothing
all your efforts. Internal stresses will appear
in the photoplate, which won’t allow for the
plate to reach a “calm down” during a long time.
Therefore the frame surface to which the photoplate
is pressed should be ideally plane and thoroughly
polished. Then after pressing the internal stresses
won’t appear in the photoplate and the prolonged
stabilization of the scheme won’t become necessary.
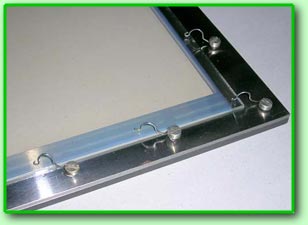 4.
Pressing the photoplate to the frame applying
a minimum force. It might seem that it’s sufficient
to press the photoplate to the steel frame using
a good steel clamp along the whole diameter
and stability of the photoplate will be secured.
But on the contrary such a stiff pressing can
again cause appearance of internal stresses
in the photoplate and result in negative consequences.
Therefore the plate should be pressed to the
frame with the help of weak spring clamps in
several places along its perimeter, see the
photo. Such an option of the fastening on the one
hand allows to dampen external influences acting
on the photoplate due to its pressing to the
massive metallic frame and on the other hand
allows to avoid appearance of internal stresses. 4.
Pressing the photoplate to the frame applying
a minimum force. It might seem that it’s sufficient
to press the photoplate to the steel frame using
a good steel clamp along the whole diameter
and stability of the photoplate will be secured.
But on the contrary such a stiff pressing can
again cause appearance of internal stresses
in the photoplate and result in negative consequences.
Therefore the plate should be pressed to the
frame with the help of weak spring clamps in
several places along its perimeter, see the
photo. Such an option of the fastening on the one
hand allows to dampen external influences acting
on the photoplate due to its pressing to the
massive metallic frame and on the other hand
allows to avoid appearance of internal stresses.
5. Stabilization of the whole holographic scheme
immediately before recording a hologram. Don’t
forget that you have held the plate in your
hands, have touched the spring clamps and that
you simply breathed upon all these fixtures,
mirrors and frames. So you have introduced a
certain heat disbalance into the holographic
scheme. Because of these invisible and weak
thermal flows mechanical stresses will again
occur in the scheme which will disappear gradually
only during stabilization of the scheme in the
process of equalization of temperature. The
time of stabilization depends on many factors
and it has its proper value for every holographic
scheme, for every object and every size of the
hologram. It depends even on location of the
room and building in which the holographic unit
is situated. If for example the building is
situated near the underground line or big highway
you can expect nothing good from such proximity.
The time of stabilization should be chosen experimentally.
For the copying apparatus described in our lessons
the time of stabilization for the hologram with
the sizes 28x40 cm doesn’t exceed 7 min. It’s
a rather small time. After stabilization of
the scheme the photoplate is exposed during
the estimated time and then its photochemical
treatment is carried out which is fully analogous
to the treatment described in the
Lesson 10.
Photos below show the holograms recorded
with the help of the pulse laser and copied
on described unit.
|