|
10. Hologram
development
The
developer mentioned in the previous part is concentrated.
The working solution is prepared directly before
development. The concentrated solution is dissolved
in ratio 15/400 that means 15 ml of the concentrated
developer is taken for each 400 ml of the working
solution. Pour 15 ml of the developer into the graduated
cylinder, then pour it into the retort and dissolve
with distilled water to 400 ml. Mix it thoroughly
and let it stabilize for not less than 5 minutes
or heterogeneity of the solution will influence
on a quality of a hologram. At dissolving you may
regulate temperature of the developer. It should
be 18-19oC. Temperature of the fixer
should be the same.
Prepare 6 trays of the corresponding size. The first
tray is for the developer, the second one is for
the fixer. Switch the white light off and switch
the light green light on. The photoplate is not
sensitive to it. Take the exposed photoplate out
of the box carefully, put it in the developer with
its emulsion layer upwards (!) and start your stop-watch.
Put the third empty tray on the tray with the photoplate.
It stabilizes the temperature and prevents accidental
exposure of the photoplate. Rock the tray several
times a minute. Development time of a hologram in
GP-2 is 15 minutes and it is 5 minutes in GP-3 developer.
It is possible to use both developers, but it seems,
it is better to use GP-3 developer for the last
batches of PFG-03m.
After development pour out the developer. (It cannot
be used for the second time because it exhausts
during work.) Move the photoplate into the washing
tray for 1 - 2 minutes. Touch only edges of the
photoplate! The gelatin layer swells in water and
becomes very soft. The lightest touch of your fingers
may cause ineradicable damage and even separation
of the layer from the glass substrate.
After washing move the plate into the fixer for
1 minute and rock it each 5 - 10 seconds. After
fixing has been over you may switch the white light
on and wash the photoplate during 10 minutes.
While the hologram is being washed you may examine
quality of its chemical processing looking at the
emulsion layer color on the exposed and unexposed
areas. The exposed areas of the hologram should
be transparent and be light brown 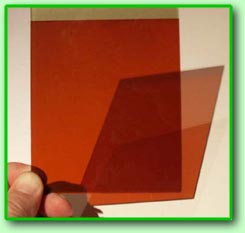 (see photo). Such a color
of the emulsion is indication of fine-grain development,
which was conducted correctly. If the hologram is
absolutely transparent or it is dark brown development
is not successful. Probably, concentration of the
developer is not correct. (see photo). Such a color
of the emulsion is indication of fine-grain development,
which was conducted correctly. If the hologram is
absolutely transparent or it is dark brown development
is not successful. Probably, concentration of the
developer is not correct.
Unexposed
areas of the hologram (under the piece of paper
covering the front edge of the photoplate, e.g.)
must be opaque and grey-green. There were no exposed
microcrystals of silver bromide with the latent
image centres formed on their surface. They define
selectivity of the physical developer performance.
As a result during developing silver atoms deposit
spontaneously from the solution on casual microcrystals
of silver bromide and development has chaotic unselective
nature.
Therefore you should not wonder that a hologram
looks opposite in comparison with usual photoplates:
its exposed area is more transparent. This circumstance
shows a specific nature of physical development.
The emulsion color of the unexposed areas is very
important for examination of the photoplate quality.
If it is grey-green, the emulsion is fresh and its
fog is not substantial. If the unexposed areas are
dark grey or even black the fog has intensified
and selective development of even unexposed crystals
is happening. It means that the photoplates begin
to age and they must be turned into holograms as
soon as possible. At first the fog appears on the
edges of the photoplate and gradually reaches to
the centre. This process is quite slow, nevertheless,
it is necessary to check the photoplates periodically
to control their condition.-->
|