|
17. Object
setting
 Setting
the object for recording the hologram in particular
and work with the object on the pulse setup
in general are considerably easier than by the
work with a continuous laser. There are no restrictions
on a material of which the object is made. It
can a domestic animal or flower, splashes of
water and so on. Hence by setting the object
basic attention is paid to work at composition
and to optimum light solution. As a rule this
work is individual and is determined by nature
of the object being recorded. Let us consider
several examples of setting different objects. Setting
the object for recording the hologram in particular
and work with the object on the pulse setup
in general are considerably easier than by the
work with a continuous laser. There are no restrictions
on a material of which the object is made. It
can a domestic animal or flower, splashes of
water and so on. Hence by setting the object
basic attention is paid to work at composition
and to optimum light solution. As a rule this
work is individual and is determined by nature
of the object being recorded. Let us consider
several examples of setting different objects.
Classical
objects
Classical objects are the objects which don’t
require specific lighting and for illumination
of which a standard scheme described in
lesson 16 is used.
These are portraits of people, domestic animals,
classical still lives with flowers and so on.
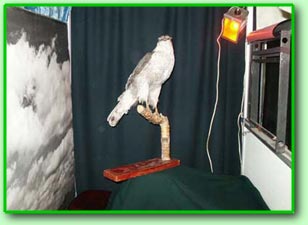
In the fig. above a stuffed falcon ready for
shooting is shown. The falcon is fixed on the
object table of the shooting cabin and a dark
fabric covers the table. On the back wall of
the cabin a photo of sky is hung. The falcon
is illuminated by wide beams from two sides.
Scattered light illuminates the photo of light
hung in the background. This fact creates additional
illusion of space on the hologram. By setting
the object distance from it to the photographic
plate is checked up (about 30-35 cm) and also
absence of screening the reference beam by the
upper part of the object is verified. The reference
beam passes above the object from above downward
and incidents upon the photographic plate under
the angle of 60 degrees and if the object is
situated very close to the photographic plate
its upper part can screen the reference beam.
In the same way every of two illuminating beams
which should exactly incident upon the object
is checked.
Luminous
inscriptions
 Luminous
inscriptions or symbols floating behind or before
the main holographic image can be important
elements in advertising or representative holograms.
In combination with the main three-dimensional
image they create an interesting and attractive
effect. In the fig. such an element is a luminous
arrow. For recording the inscription on a hologram
the illumination scheme changes significantly,
see fig. below. The beam divider and one of
the glass diffusers are removed and the widened
but not diffused beam is sent on the object
table on which the additional optical scheme
is mounted. The illuminating beam is directed
on the first glass diffuser 3 by two
big mirrors 1. This diffuser serves for
increase of homogeneity of the illuminating
beam. At the distance of about 5 cm from it
the second diffuser 3 Luminous
inscriptions or symbols floating behind or before
the main holographic image can be important
elements in advertising or representative holograms.
In combination with the main three-dimensional
image they create an interesting and attractive
effect. In the fig. such an element is a luminous
arrow. For recording the inscription on a hologram
the illumination scheme changes significantly,
see fig. below. The beam divider and one of
the glass diffusers are removed and the widened
but not diffused beam is sent on the object
table on which the additional optical scheme
is mounted. The illuminating beam is directed
on the first glass diffuser 3 by two
big mirrors 1. This diffuser serves for
increase of homogeneity of the illuminating
beam. At the distance of about 5 cm from it
the second diffuser 3
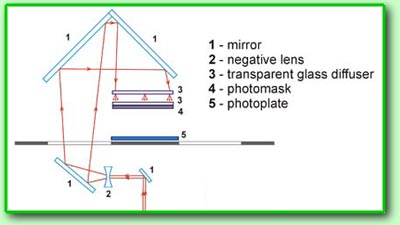 with
the photomask of the inscription 4 is
located. The photomask is fixed to the side
of the diffuser, which looks towards the photoplate
5. For creation of the holographic luminous
inscription a high-quality negative photomask
of this inscription is needed (transparent letters
on the dark background). At first the inscription
is printed on a high-quality printer and then
it's copied on a contrast photographic plate.
The VRP photoplates are very well fit for these
purposes. The photomask is fastened to the dim
glass and at that the diffusive surface of the
glass should be pressed to the emulsion side
of the photomask in order to get a maximum sharpness
of the inscription. The photomask is fixed on
the shooting table at that spatial position
where it should be situated in the holographic
image. After adjustment of the scheme the plane
around the photomask is closed by screens in
order to isolate outside beams from the photoplate
for recording. with
the photomask of the inscription 4 is
located. The photomask is fixed to the side
of the diffuser, which looks towards the photoplate
5. For creation of the holographic luminous
inscription a high-quality negative photomask
of this inscription is needed (transparent letters
on the dark background). At first the inscription
is printed on a high-quality printer and then
it's copied on a contrast photographic plate.
The VRP photoplates are very well fit for these
purposes. The photomask is fastened to the dim
glass and at that the diffusive surface of the
glass should be pressed to the emulsion side
of the photomask in order to get a maximum sharpness
of the inscription. The photomask is fixed on
the shooting table at that spatial position
where it should be situated in the holographic
image. After adjustment of the scheme the plane
around the photomask is closed by screens in
order to isolate outside beams from the photoplate
for recording.
The transparent master hologram of the object
with the luminous inscription is recorded by
two steps. At first the master hologram of the
three-dimensional object is recorded and after
shooting its position in the shooting cabin
is measured. The photomask is set on the object
table taking into account these measurements.
Then the second master hologram with the luminous
inscription is recorded. After chemical treatment
both holograms are connected together and position
of the image of the three-dimensional object
and position of the inscription are finally
superposed. Then copying of the doubled master
hologram is executed. Sometimes it’s necessary
to make several test records of the master hologram
with the inscription in order to position the
inscription in the resulting image more precisely.
Punctual
highlighting of the object using an optical
fiber bundle
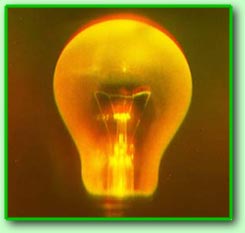 Sometimes
local point highlighting of the object details,
e.g. a filament of the electric bulb, is needed,
see fig. (It’s known that self-luminous objects
– candles, electric bulbs, wicks and so on,
can’t be recorded on the hologram, since only
the laser light reflected from the object is
registered on the hologram). For these purposes
it’s most convenient to use an optical fiber
bundle, which can be fixed in any place on the
object table or on the wall of the shooting
cabin and to direct the beam into the required
place. Scheme of the combined illumination of
the object with the help of a standard wide
beam and an optical fiber bundle is shown in
the fig. below. Immediately behind the light
splitter 1 a standard beam is widened
by the negative lens 2 and is directed
by the mirror 3 to the transparent glass
diffuser 4 and further to the object
6. Sometimes
local point highlighting of the object details,
e.g. a filament of the electric bulb, is needed,
see fig. (It’s known that self-luminous objects
– candles, electric bulbs, wicks and so on,
can’t be recorded on the hologram, since only
the laser light reflected from the object is
registered on the hologram). For these purposes
it’s most convenient to use an optical fiber
bundle, which can be fixed in any place on the
object table or on the wall of the shooting
cabin and to direct the beam into the required
place. Scheme of the combined illumination of
the object with the help of a standard wide
beam and an optical fiber bundle is shown in
the fig. below. Immediately behind the light
splitter 1 a standard beam is widened
by the negative lens 2 and is directed
by the mirror 3 to the transparent glass
diffuser 4 and further to the object
6.
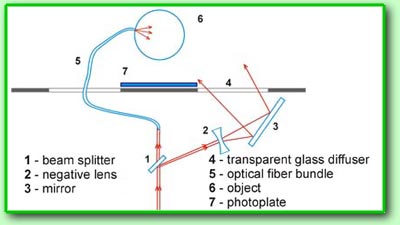 The
second beam from the light divider is input
into the optical fiber bundle 5 which
is fixed in the shooting cabin and which highlights
the required part of the object 6. Sometimes
in order to secure more precise highlighting
the lens is fixed on the end of the cord that
allows correcting illumination field more precisely.
Quality of illumination of the object in this
case as in the previous case is determined only
by recording test holograms of small dimensions. The
second beam from the light divider is input
into the optical fiber bundle 5 which
is fixed in the shooting cabin and which highlights
the required part of the object 6. Sometimes
in order to secure more precise highlighting
the lens is fixed on the end of the cord that
allows correcting illumination field more precisely.
Quality of illumination of the object in this
case as in the previous case is determined only
by recording test holograms of small dimensions.
References
1. Sergey P. Vorobyov, Some techniques of art
hologram recording by pulse laser, Materials
of the First International Forum "Holography
EXPO-2004", Moscow, Oct. 2004 p. 50.
-->
|