|
Homemade holograms
S.P. Vorobyov and
S.M. Zharkiy, Moscow
Introduction
Display holograms attract people because of their unusual
properties. Many enthusiasts are interested
in holography. Usually, amateur holographers
face the problem of purchasing of the necessary
equipment. This article describes the simple
holographic setup and processing, which allow
to record small reflection holograms in domestic
conditions even by children.
Design of the holographic setup is based on
four principles:
1. Use of laser pointer, as a source of coherent
light.
2. Use of Denisyuk's holographic scheme.
3. Use of holographic photoplates PFG-03m for
recording of reflection holograms.
4. Use of a free-flowing material for installation
of parts of the holographic scheme.
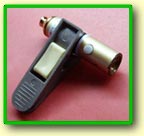
 Laser
pointer Laser
pointer
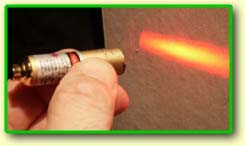
Simple laser pointer contains the low-power
semi-conductor laser, which radiates red light
and focusing lens. The divergent beam is necessary
for hologram recording, therefore lens should
be extracted, and then laser pointer will radiate
a wide beam of light, sufficient for illumination
of small objects, see fig.
Denisyuk�s
hologram recording scheme
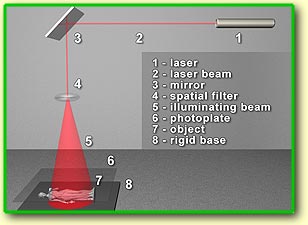 Holographic
scheme of Yuri Denisyuk (see fig.) is widely
known, its basic advantages - simplicity of
the design and high quality of holograms recorded.
Narrow light beam 2 from the laser
1 is directed by the mirror 3 to
spatial filter 4, which expands the beam
up to the necessary size and simultaneously
improves its homogeneity. Expanded beam 5
exposes photoplate 6 and the object
7, which is fixed on a rigid base
8. Laser light is reflected from the object
to the photo plate from the reverse side. Two
beams meet each other in the photo plate's plane:
the first beam goes from the laser and it is
called a "reference beam" and the second one,
which goes from the object, is called a "signal
beam". Holographic
scheme of Yuri Denisyuk (see fig.) is widely
known, its basic advantages - simplicity of
the design and high quality of holograms recorded.
Narrow light beam 2 from the laser
1 is directed by the mirror 3 to
spatial filter 4, which expands the beam
up to the necessary size and simultaneously
improves its homogeneity. Expanded beam 5
exposes photoplate 6 and the object
7, which is fixed on a rigid base
8. Laser light is reflected from the object
to the photo plate from the reverse side. Two
beams meet each other in the photo plate's plane:
the first beam goes from the laser and it is
called a "reference beam" and the second one,
which goes from the object, is called a "signal
beam".
 These
beams create an interference pattern, which
is registered on the photo plate. If we use
a laser pointer, even the spatial filter, which
raises uniformity of a beam and an expanding
lens are not required, as the semi-conductor
laser itself radiates quite homogeneous, divergent
beam of light. Therefore for assembly of the
Denisyuk's scheme, one should have a laser diode,
the rigid support for photo plate fastening
and the object itself. If it's necessary, one
should use a rotary mirror 3, which directs
a beam in a required direction. These
beams create an interference pattern, which
is registered on the photo plate. If we use
a laser pointer, even the spatial filter, which
raises uniformity of a beam and an expanding
lens are not required, as the semi-conductor
laser itself radiates quite homogeneous, divergent
beam of light. Therefore for assembly of the
Denisyuk's scheme, one should have a laser diode,
the rigid support for photo plate fastening
and the object itself. If it's necessary, one
should use a rotary mirror 3, which directs
a beam in a required direction.
Holographic
plates
Holographic plates PFG-03m - transparent silver
halide photo plates with very high resolution
- more than 5000 lines/mm. They are used for
recording reflection holograms in Denisyuk's
scheme. They are sensitized to red spectrum
to record holograms by He-Ne laser. These photoplates
are suitable for hologram recording by laser
diode as well.
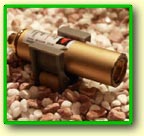
Fastening
of holographic scheme parts
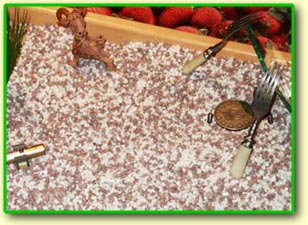
It is known, the sand or fine gravel suppresses
well mechanical oscillation and vibration. This
property of fine gravel is valuable at creation
of domestic holographic setup, as
free-flowing materials
are available in many shops. The phototray is
filled with the gravel, see fig. avove. A clothes-pin
is used for fastening of laser pointer, see
fig. This allows placing the laser on gravel
and at the same time pressing the button, so
the laser constantly radiates a beam of light.
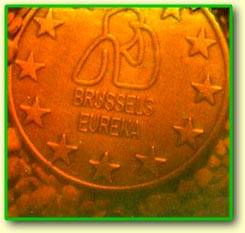
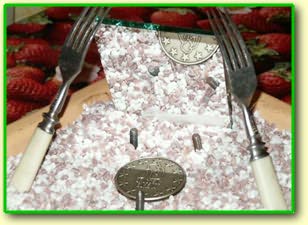 The
object (medal, coin or other small object) is
put directly on gravel, which was condensed
beforehand in an area of installation. The
object (medal, coin or other small object) is
put directly on gravel, which was condensed
beforehand in an area of installation.
The photoplate is put up on three screws partially
buried in gravel, since it is known, that the
system with three basic points is steadiest.
To direct a laser beam to the object under the
necessary angle and to make the holographic
scheme more compact, the large rotary mirror
is installed under the angle about 45 degrees.
Two simple forks are used as support for a mirror,
see fig. The sequence of hologram recording
is (white light is switched off), see fig. below.
 1.
A sheet of a white paper is put on the supporting
screws; its size is equal to the size of a photoplate.
Changing a position of laser pointer, one should
achieve uniform illumination of a sheet of a
paper. 1.
A sheet of a white paper is put on the supporting
screws; its size is equal to the size of a photoplate.
Changing a position of laser pointer, one should
achieve uniform illumination of a sheet of a
paper.
2. Next step: a beam of the laser should be
blocked by a sheet of black paper, then accurately
replace a sheet of a white paper with a photoplate
PFG-03m on the supporting screws. End face of
a photoplate should be covered by a strip of
black paper, in order to avoid exposure of end
face by reference beam.
3. One should reserve time 1-2 minutes for complete
stabilization of all elements of the scheme.
4. Then cautiously lift sheet of a black paper
and expose photoplate 5-10 sec. Note: exact
time of exposure should be found out before
the procedure (see the article "Determination
of exposing time of holograms").
5. Then there is a standard chemical photographic
processing of a photoplate in a developer
GP-3 and fixing solution.
6. If a grey veil is visible on the hologram
and the image is not bright, this means the
exposition is insufficient and it is necessary
to increase exposure time. If the hologram has
a dark brown color and the image is dim, this
means, the hologram is overexposed and it's
necessary to reduce exposure. If some dark strips
are visible on the hologram, this means some
of part of the scheme was displaced during hologram
recording. It is necessary to check up carefully
stability of a placement of all elements of
the scheme, and then repeat procedure of hologram
recording.
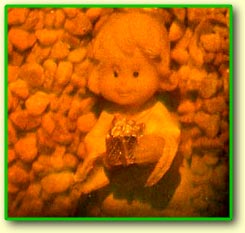
The holograms
Authors of this article have recorded several
small reflection holograms of satisfactory quality
using described scheme (see the photos).
Mentioned method of hologram recording, certainly
does not allow obtaining holograms of high quality
and big size. Its basic purpose is educational,
in order to teach basics of applied holography
to beginners and inspire them to start mastering
of serious trends of a modern holography.
|