|
8. Hologram
recording
Well,
everything is ready to record a hologram: holographic
system was installed, photoplates were prepared
and exposure time was measured. If a size of photoplate
does not correspond to a size of a hologram, you
should cut a photoplate of the necessary size, e.g.
9x12cm. Beforehand you have to make a sketch on
a white paper and purchase a glass-cutter.
Quality of cutting depends greatly on a glass-cutter.
It is better to use a diamond glass-cutter since
it produces a flatter cut line and less glass splinters.
Try to cut a piece of usual glass beforehand till
your cutting becomes stable and qualitative, because
at the weak light your operations must be very neat.
 Cut a standard photoplate
of a hologram size using a glass-cutter and put
it on three supports with its emulsion layer below
(See lesson 6). Cover
the front edge with a piece of black paper. It is
necessary to prevent penetration of a reference
beam onto the photoplate edge and its reflection
inside the glass that may cause a series of parallel
dark strips in the image. If a shadow of black paper
piece spreads over the object of shooting or the
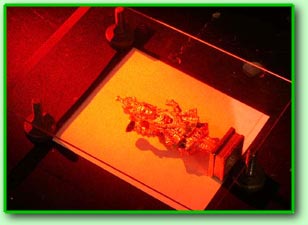
background, you should increase the size of photoplate,
e.g. up to 9x14 cm (See photo). You can see on the
photo that shadow spreads over the upper part of
the white background. It is possible to cut an extra
piece of the photoplate when a hologram is ready. Cut a standard photoplate
of a hologram size using a glass-cutter and put
it on three supports with its emulsion layer below
(See lesson 6). Cover
the front edge with a piece of black paper. It is
necessary to prevent penetration of a reference
beam onto the photoplate edge and its reflection
inside the glass that may cause a series of parallel
dark strips in the image. If a shadow of black paper
piece spreads over the object of shooting or the
background, you should increase the size of photoplate,
e.g. up to 9x14 cm (See photo). You can see on the
photo that shadow spreads over the upper part of
the white background. It is possible to cut an extra
piece of the photoplate when a hologram is ready.
Cut a sheet of red or black paper of the hologram
size and put it onto the glass plate. Check homogeneity
of lighting, if it is necessary adjust the beam
position. Cover the beam with a piece of black paper
in such a way it can be easily removed before exposure
starts.
Switch the white light off and switch the weak green
light on. The photoplates are not sensitive to it.
Put your rubber gloves on. Open a box with photoplates,
take out one of them and put it on the template,
emulsion layer should be below. It is easy to define
where the emulsion layer is. Breath on the photoplate
surface. If it is misted, it is glass. If it is
not misted, it is an emulsion layer (gelatin absorbs
moisture from the air). You should cut the photoplate
only on the glass side. After each cutting procedure
shake off the template to get rid of splinters otherwise
you may scratch the emulsion layer. Cut photoplates
directly before their exposure. Cut photoplates
directly before their exposure. Contacts of photoplates
and paper decrease shelf life of photoplates. Because
of that at the factory plates are always packed
by pairs through the edge seals with the emulsion
layer inwards.
Take
a photoplate and look at the weak green light through
it. If you notice specks of dust or glass splinters
on the photoplate surface, remove them very carefully
with a soft brush. If glass splinters are not removed
with a brush, they may be removed with a sharp knife
or a razor blade but only on the glass side!
Check the photoplate and put it carefully onto the
supports and shut its front edge with a piece of
black paper. Wait for a minute. It is necessary
to eliminate mechanical and heat stresses in the
photoplate before it is exposed. These stresses
may cause micro shifts of the plate and degradation
of the hologram quality. According to calculations,
shift of interference pattern should not be more
than 0.005 mkm. Stabilization time increases when
a photoplate size increases. Stabilization time
should be at least 5 min for a hologram of 18x24
cm.
Open the laser beam and expose the photoplate. Try
to be not very close to the photoplate since your
movements may affect the photoplate position. Ideally
it is possible to make a camera shutter with remote
control and expose a hologram from the next room.
So that influence of mechanical and heat vibrations
of air on the photoplate during its exposure will
be completely removed.
If the hologram brightness is not very good, you
must check if the table of recording damp out vibrations
well. (See recommendations of lesson
6).
After exposure, put the photoplate in the box with
its emulsion layer upwards. -->
|