|
12. Hologram
presentation
Final
lesson of this section is devoted to presentation
of the hologram for audience. Basic operations are:
painting, cutting, cleaning, mounting into frame
and illumination of the prepared hologram.
Emulsion layer of the hologram isn't strong and
can be damaged by accidental touch and hence it
should be protected - painted using black color
or sealed up by black pressure sensitive adhesive
(self-adhesive film). Black color of the protective
cover makes the hologram opaque. This increases
image contrast and allows using back parts of any
color for mounting the hologram into frame.
Please use quick-drying paint in sprayer for painting
motor-cars. This paint gives more uniform cover
and it is more convenient for use. Sometimes there
is some little amount of water in aerosol cans with
low-quality paint. Before painting, direct the jet
of paint from the new sprayer at a piece of paper
or cardboard. If color bubbles some water can be
contained in it. At first try to paint a rejected
hologram. If red spots and stains remained on the
hologram after full color dry-ing up it means that
there is some water in the color and it should be
replaced. For getting a dense non-transparent cover
it's desirable to put successively two color layers.
When humidity in the room is increased then after
putting even a good color the image on the hologram
also turns red (moisture from air is partially carried
along by a color jet) but after full color drying
up which can last several hours the image color
is restored completely.
Protection of the hologram using black pressure
sensitive adhesive is more preferable because a
film is more prefer than a color layer and also
the room shouldn't be ventilated. The film can be
applied manually or using a photo-roller for photo
glossing. By sticking on the film you should be
very accurate and seek that there appear no air
bubbles under the film. The point is that it's practically
impossible to remove these bubbles after completion
of the film sticking on. The bubbles can also appear
on small particles, which remained on the hologram
surface so try again to remove all small particles
from the hologram surface. You should gain some
experience in order to stick on the film with good
quality. Please train to do this in advance using
ordinary glass plates. After sticking on the film
cut the outstanding edges with the help of a sharp
knife.
After protection of the emulsion layer you can proceed
to the following operation - cutting off the hologram.
Dimensions of the hologram do not necessarily match
sizes of the frame in which the hologram should
be mounted. For example, not exposed edges of the
hologram can prevent this. For cutting off the hologram
a glass cutter, ruler and of course a deep experience
of glass cutter using. As a last resort you can
address yourself for consultation to the shop where
window glass is sold. Cut off the hologram using
the dimensions, which are 1-2 mm less than the frame
sizes. In order not to cut hands please put on rubber
gloves.
Immediately before mounting the hologram into frame
it's necessary to wipe its glass surface since traces
of alcohol drying up, finger-prints and so on can
remain on it. For doing this use household liquid
for glass cleaning. At first wipe the hologram clean
with the help of the cotton wool piece wetted in
liquid and then wipe it dry using a clean rag. Don't
allow liquid to get on the emulsion side - the fact
is that it can penetrate even through the painted
layer and damage the hologram.
 The last operation - mounting
the hologram into frame. Accurately insert the hologram
into frame, close it by a cardboard back cover and
fix it with the help of small nails and special
clamps. Now the hologram is ready (see photo). The last operation - mounting
the hologram into frame. Accurately insert the hologram
into frame, close it by a cardboard back cover and
fix it with the help of small nails and special
clamps. Now the hologram is ready (see photo).
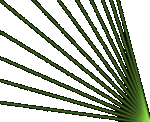
In conclusion some words about illumination of the
hologram. Illumination of the hologram is an extremely
important moment for getting a good quality three-dimensional
image. Lighting source should be bright and have
the least possible dimensions. Only then the image
restored by the hologram will be sharp over the
whole volume. For illumination of the hologram can't
be used: daylight lamps, lamps with big shades,
chandeliers with several lamps, sun light (when
sun is closed by clouds), and so on. At present
optimum solution consists in using halogen lamps
with supply voltage of 12 Volts. They have a long
service life, small sizes and can concentrate light
into narrow space angle due to 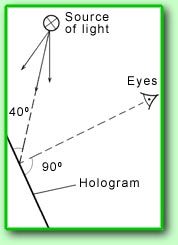 presence of the reflector.
Our experience shows that for domestic conditions
a halogen lamp with power of 35 Watt and the illumination
angle of 24 degrees is quite appropriate. For demonstration
of the hologram at the exhibitions where bright
surrounding lighting exists it's more preferable
to use halogen lamps with power of 50 Watt and with
the space angle of 10 degrees. The hologram should
be illuminated under the same angle under which
the reference beam fell by the hologram recording
(see photo). Optimum distance from the halogen lamp
to the hologram center is equal to 30-40 cm for
small holograms (up to 18x24 cm) and 60-80 cm for
holograms of bigger format (up to 28x40 cm). The
lighter can be mounted on the wall independently
of the hologram or can be fixed directly on the
frame. Concrete way is determined by your wishes
and abilities. --> presence of the reflector.
Our experience shows that for domestic conditions
a halogen lamp with power of 35 Watt and the illumination
angle of 24 degrees is quite appropriate. For demonstration
of the hologram at the exhibitions where bright
surrounding lighting exists it's more preferable
to use halogen lamps with power of 50 Watt and with
the space angle of 10 degrees. The hologram should
be illuminated under the same angle under which
the reference beam fell by the hologram recording
(see photo). Optimum distance from the halogen lamp
to the hologram center is equal to 30-40 cm for
small holograms (up to 18x24 cm) and 60-80 cm for
holograms of bigger format (up to 28x40 cm). The
lighter can be mounted on the wall independently
of the hologram or can be fixed directly on the
frame. Concrete way is determined by your wishes
and abilities. -->
|